Installing MySQL 5.6 on Ubuntu 14.10 (Utopic Unicorn)

Installing ‘mysql’ on Ubuntu 14.10 will default to version 5.5, but also included is MySQL 5.6 is an option.

These are the steps I ran through to install it on a fresh Digital Ocean droplet. On a local machine, you will need to add sudo:


root@ubuntu1410:~# apt-get install mysql-server-5.6
Reading package lists... Done
Building dependency tree
Reading state information... Done
The following packages were automatically installed and are no longer required:
linux-headers-3.16.0-21 linux-headers-3.16.0-21-generic linux-image-3.16.0-21-generic linux-image-extra-3.16.0-21-generic
Use 'apt-get autoremove' to remove them.
The following extra packages will be installed:
libaio1 libdbd-mysql-perl libdbi-perl libhtml-template-perl libmysqlclient18 libterm-readkey-perl mysql-client-5.6
mysql-client-core-5.6 mysql-common mysql-common-5.6 mysql-server-core-5.6
Suggested packages:
libclone-perl libmldbm-perl libnet-daemon-perl libsql-statement-perl libipc-sharedcache-perl mailx tinyca
The following NEW packages will be installed:
libaio1 libdbd-mysql-perl libdbi-perl libhtml-template-perl libmysqlclient18 libterm-readkey-perl mysql-client-5.6
mysql-client-core-5.6 mysql-common mysql-common-5.6 mysql-server-5.6 mysql-server-core-5.6
0 upgraded, 12 newly installed, 0 to remove and 3 not upgraded.
Need to get 21.8 MB of archives.
After this operation, 165 MB of additional disk space will be used.
Do you want to continue? [Y/n] Y
Get:1 http://mirrors.digitalocean.com/ubuntu/ utopic/main libaio1 amd64 0.3.110-1 [6,454 B]
Get:2 http://mirrors.digitalocean.com/ubuntu/ utopic-updates/main mysql-common all 5.5.41-0ubuntu0.14.10.1 [13.5 kB]
Get:3 http://mirrors.digitalocean.com/ubuntu/ utopic-updates/main libmysqlclient18 amd64 5.5.41-0ubuntu0.14.10.1 [603 kB]
Get:4 http://mirrors.digitalocean.com/ubuntu/ utopic/main libdbi-perl amd64 1.631-3build1 [770 kB]
Get:5 http://mirrors.digitalocean.com/ubuntu/ utopic/main libdbd-mysql-perl amd64 4.028-2 [88.6 kB]
Get:6 http://mirrors.digitalocean.com/ubuntu/ utopic/main libterm-readkey-perl amd64 2.32-1build1 [25.0 kB]
Get:7 http://mirrors.digitalocean.com/ubuntu/ utopic/universe mysql-client-core-5.6 amd64 5.6.19-1~exp1ubuntu2 [4,061 kB]
Get:8 http://mirrors.digitalocean.com/ubuntu/ utopic/universe mysql-client-5.6 amd64 5.6.19-1~exp1ubuntu2 [5,654 kB]
Get:9 http://mirrors.digitalocean.com/ubuntu/ utopic/universe mysql-server-core-5.6 amd64 5.6.19-1~exp1ubuntu2 [4,777 kB]
Get:10 http://mirrors.digitalocean.com/ubuntu/ utopic/universe mysql-server-5.6 amd64 5.6.19-1~exp1ubuntu2 [5,710 kB]
Get:11 http://mirrors.digitalocean.com/ubuntu/ utopic/main libhtml-template-perl all 2.95-1 [65.5 kB]
Get:12 http://mirrors.digitalocean.com/ubuntu/ utopic/universe mysql-common-5.6 all 5.6.19-1~exp1ubuntu2 [13.5 kB]
Fetched 21.8 MB in 4s (5,436 kB/s)
Preconfiguring packages ...
Selecting previously unselected package libaio1:amd64.
(Reading database ... 115597 files and directories currently installed.)
Preparing to unpack .../libaio1_0.3.110-1_amd64.deb ...
Unpacking libaio1:amd64 (0.3.110-1) ...
Selecting previously unselected package mysql-common.
Preparing to unpack .../mysql-common_5.5.41-0ubuntu0.14.10.1_all.deb ...
Unpacking mysql-common (5.5.41-0ubuntu0.14.10.1) ...
Selecting previously unselected package libmysqlclient18:amd64.
Preparing to unpack .../libmysqlclient18_5.5.41-0ubuntu0.14.10.1_amd64.deb ...
Unpacking libmysqlclient18:amd64 (5.5.41-0ubuntu0.14.10.1) ...
Selecting previously unselected package libdbi-perl.
Preparing to unpack .../libdbi-perl_1.631-3build1_amd64.deb ...
Unpacking libdbi-perl (1.631-3build1) ...
Selecting previously unselected package libdbd-mysql-perl.
Preparing to unpack .../libdbd-mysql-perl_4.028-2_amd64.deb ...
Unpacking libdbd-mysql-perl (4.028-2) ...
Selecting previously unselected package libterm-readkey-perl.
Preparing to unpack .../libterm-readkey-perl_2.32-1build1_amd64.deb ...
Unpacking libterm-readkey-perl (2.32-1build1) ...
Selecting previously unselected package mysql-client-core-5.6.
Preparing to unpack .../mysql-client-core-5.6_5.6.19-1~exp1ubuntu2_amd64.deb ...
Unpacking mysql-client-core-5.6 (5.6.19-1~exp1ubuntu2) ...
Selecting previously unselected package mysql-client-5.6.
Preparing to unpack .../mysql-client-5.6_5.6.19-1~exp1ubuntu2_amd64.deb ...
Unpacking mysql-client-5.6 (5.6.19-1~exp1ubuntu2) ...
Selecting previously unselected package mysql-server-core-5.6.
Preparing to unpack .../mysql-server-core-5.6_5.6.19-1~exp1ubuntu2_amd64.deb ...
Unpacking mysql-server-core-5.6 (5.6.19-1~exp1ubuntu2) ...
Processing triggers for man-db (2.7.0.2-2) ...
Setting up mysql-common (5.5.41-0ubuntu0.14.10.1) ...
Selecting previously unselected package mysql-server-5.6.
(Reading database ... 115966 files and directories currently installed.)
Preparing to unpack .../mysql-server-5.6_5.6.19-1~exp1ubuntu2_amd64.deb ...
Unpacking mysql-server-5.6 (5.6.19-1~exp1ubuntu2) ...
Selecting previously unselected package libhtml-template-perl.
Preparing to unpack .../libhtml-template-perl_2.95-1_all.deb ...
Unpacking libhtml-template-perl (2.95-1) ...
Selecting previously unselected package mysql-common-5.6.
Preparing to unpack .../mysql-common-5.6_5.6.19-1~exp1ubuntu2_all.deb ...
Unpacking mysql-common-5.6 (5.6.19-1~exp1ubuntu2) ...
Processing triggers for man-db (2.7.0.2-2) ...
Processing triggers for ureadahead (0.100.0-16) ...
Setting up libaio1:amd64 (0.3.110-1) ...
Setting up libmysqlclient18:amd64 (5.5.41-0ubuntu0.14.10.1) ...
Setting up libdbi-perl (1.631-3build1) ...
Setting up libdbd-mysql-perl (4.028-2) ...
Setting up libterm-readkey-perl (2.32-1build1) ...
Setting up mysql-client-core-5.6 (5.6.19-1~exp1ubuntu2) ...
Setting up mysql-client-5.6 (5.6.19-1~exp1ubuntu2) ...
Setting up mysql-server-core-5.6 (5.6.19-1~exp1ubuntu2) ...
Setting up mysql-server-5.6 (5.6.19-1~exp1ubuntu2) ...
2015-03-09 09:55:55 0 [Warning] Using unique option prefix key_buffer instead of key_buffer_size is deprecated and will be removed in a future release. Please use the full name instead.
2015-03-09 09:55:55 0 [Warning] TIMESTAMP with implicit DEFAULT value is deprecated. Please use --explicit_defaults_for_timestamp server option (see documentation for more details).
mysql start/running, process 19834
Setting up libhtml-template-perl (2.95-1) ...
Setting up mysql-common-5.6 (5.6.19-1~exp1ubuntu2) ...
Processing triggers for libc-bin (2.19-10ubuntu2.3) ...
Processing triggers for ureadahead (0.100.0-16) ...

Some additional notes:

  • You will be prompted for a password for the root user. You can change it later, but best to think of something meaningful and write it down.
  • The two WARNINGS that you see are quite safe. The default Ubuntu configuration uses a deprecated name for a configuration setting (Bug #1362393), and MySQL is warning that the behavior of TIMESTAMP columns may change in the future.
  • The MySQL server should start automatically on boot. If you can not connect to MySQL, please check the file /var/log/messages. The most common reason it will not start is that the default configuration requires a server with 1GB of RAM. I have an you can use if you need it to start with less RAM.

Experimenting with the new Data Dictionary Labs Release

Labs releases are intended to provide early access to new features. As Gopal notes in his recent blog post About the Data Dictionary Labs Release, there is a notable restriction where upgrading from any previous MySQL database version is not supported.

Today, I thought I would demonstrate how to get the data dictionary lab up and running on a fresh Ubuntu 14.04 installation:

# Download from labs.mysql.com
wget http://downloads.mysql.com/snapshots/pb/mysql-5.7.5-labs-dd/mysql-5.7.5-labs-dd-linux-el6-x86_64.tar.gz
# extract it to /usr/local/mysql
# more or less following instructions in INSTALL-BINARY
groupadd mysql
useradd -r -g mysql mysql
tar -xzf mysql-5.7.5-labs-dd-linux-el6-x86_64.tar.gz
mv mysql-5.7.5-labs-dd-linux-el6-x86_64 /usr/local/
ln -s /usr/local/mysql-5.7.5-labs-dd-linux-el6-x86_64 /usr/local/mysql
cd /usr/local/mysql
chown -R mysql .
chgrp -R mysql .

At this point, the next step in the instructions actually failed for me:

bin/mysql_install_db --user=mysql
2014-10-15 09:22:34 [ERROR]   The data directory needs to be specified.

This behavior change appears to be the result of mysql_install_db being rewritten in C++. Specifying the datadir addresses this, but also results in another error:

bin/mysql_install_db --user=mysql --datadir=/usr/local/mysql/data
2014-10-15 09:24:15 [ERROR]   The child process terminated prematurely. Errno= 32
2014-10-15 09:24:15 [ERROR]   Failed to execute /usr/local/mysql-5.7.5-labs-dd-linux-el6-x86_64/bin/mysqld --no-defaults --install-server --datadir=/usr/local/mysql/data --lc-messages-dir=/usr/local/mysql/share --lc-messages=en_US
-- server log begin --

Error 32 is a broken pipe. From the description, we can see that mysql_install_db tried to call a subprocess (mysqld –install-server), but it exited prematurely. The description here doesn’t show why it exited prematurely, but we can execute this command directly to find out:

/usr/local/mysql-5.7.5-labs-dd-linux-el6-x86_64/bin/mysqld --no-defaults --install-server --datadir=/usr/local/mysql/data --lc-messages-dir=/usr/local/mysql/share --lc-messages=en_US
/usr/local/mysql-5.7.5-labs-dd-linux-el6-x86_64/bin/mysqld: error while loading shared libraries: libaio.so.1: cannot open shared object file: No such file or directory

OK! We don’t have the async IO dependency installed on this system, which is used by InnoDB:

apt-get install libaio1
Reading package lists... Done
Building dependency tree
Reading state information... Done
The following packages were automatically installed and are no longer required:
  linux-headers-3.13.0-36 linux-headers-3.13.0-36-generic
  linux-image-3.13.0-36-generic linux-image-extra-3.13.0-36-generic
Use 'apt-get autoremove' to remove them.
The following NEW packages will be installed:
  libaio1
0 upgraded, 1 newly installed, 0 to remove and 3 not upgraded.
Need to get 6,364 B of archives.
After this operation, 53.2 kB of additional disk space will be used.
Get:1 http://mirrors.digitalocean.com/ubuntu/ trusty/main libaio1 amd64 0.3.109-4 [6,364 B]
Fetched 6,364 B in 0s (319 kB/s)
Selecting previously unselected package libaio1:amd64.
(Reading database ... 116531 files and directories currently installed.)
Preparing to unpack .../libaio1_0.3.109-4_amd64.deb ...
Unpacking libaio1:amd64 (0.3.109-4) ...
Setting up libaio1:amd64 (0.3.109-4) ...
Processing triggers for libc-bin (2.19-0ubuntu6.3) ...

Now to try the original install command again:

bin/mysql_install_db --user=mysql --datadir=/usr/local/mysql/data

It should return no errors now. To follow the remaining steps in the INSTALL-BINARY instructions:


chown -R root .
chown -R mysql data
bin/mysqld_safe --user=mysql &

In MySQL 5.7, installation is secure by default. This means that a root password is automatically generated, and stored in ~/.mysql_secret:

cat ~/.mysql_secret
# Password set for user 'root@localhost' at 2014-10-15 09:32:09
Wpckgmde+U,o

It is possible to change this password with the MySQL command line client:

./bin/mysql -uroot -p
Enter password:
Welcome to the MySQL monitor.  Commands end with ; or \g.
Your MySQL connection id is 3
Server version: 5.7.5-labs-dd
Copyright (c) 2000, 2014, Oracle and/or its affiliates. All rights reserved.
Oracle is a registered trademark of Oracle Corporation and/or its
affiliates. Other names may be trademarks of their respective
owners.
Type 'help;' or '\h' for help. Type '\c' to clear the current input statement.
mysql> SET PASSWORD=PASSWORD('acdc');
Query OK, 0 rows affected (0.00 sec)

As Gopal mentioned in his blog post, the labs release runs completely without frm files:

ls /usr/local/mysql/data/mysql
catalogs.ibd                  help_relation.ibd       slave_relay_log_info.ibd
character_sets.ibd            help_topic.ibd          slave_worker_info.ibd
collations.ibd                index_column_usage.ibd  slow_log.CSM
columns.ibd                   indexes.ibd             slow_log.CSV
columns_priv.MYD              index_partitions.ibd    table_partitions.ibd
columns_priv.MYI              index_stats.ibd         table_partition_values.ibd
column_type_elements.ibd      innodb_index_stats.ibd  tables.ibd
db.MYD                        innodb_table_stats.ibd  tablespace_files.ibd
db.MYI                        ndb_binlog_index.MYD    tablespaces.ibd
db.opt                        ndb_binlog_index.MYI    tables_priv.MYD
engine_cost.ibd               parameters.ibd          tables_priv.MYI
event.MYD                     plugin.ibd              table_stats.ibd
event.MYI                     proc.MYD                time_zone.ibd
events.ibd                    proc.MYI                time_zone_leap_second.ibd
foreign_key_column_usage.ibd  procs_priv.MYD          time_zone_name.ibd
foreign_keys.ibd              procs_priv.MYI          time_zone_transition.ibd
func.MYD                      proxies_priv.MYD        time_zone_transition_type.ibd
func.MYI                      proxies_priv.MYI        triggers.ibd
general_log.CSM               routines.ibd            user.MYD
general_log.CSV               schemata.ibd            user.MYI
gtid_executed.ibd             server_cost.ibd         view_table_usage.ibd
help_category.ibd             servers.ibd
help_keyword.ibd              slave_master_info.ibd

information_schema is a now also a set of views on top of real InnoDB tables (stored in the mysql schema). As a VIEW we can explain it, and since extended explain is always enabled in 5.7, SHOW WARNINGS will show the rewritten form:

mysql> SELECT * FROM information_schema.tables WHERE table_name = 'user'\G
*************************** 1. row ***************************
  TABLE_CATALOG: def
   TABLE_SCHEMA: mysql
     TABLE_NAME: user
     TABLE_TYPE: BASE TABLE
         ENGINE: MyISAM
        VERSION: 10
     ROW_FORMAT: Dynamic
     TABLE_ROWS: 1
 AVG_ROW_LENGTH: NULL
    DATA_LENGTH: NULL
MAX_DATA_LENGTH: NULL
   INDEX_LENGTH: NULL
      DATA_FREE: NULL
 AUTO_INCREMENT: 1
    CREATE_TIME: 2014-10-15 09:32:10
    UPDATE_TIME: 2014-10-15 09:32:10
     CHECK_TIME:
TABLE_COLLATION: utf8_bin
       CHECKSUM: NULL
 CREATE_OPTIONS: stats_persistent=1
  TABLE_COMMENT: Users and global privileges
1 row in set (0.00 sec)
mysql> EXPLAIN SELECT * FROM information_schema.tables WHERE table_name = 'user'\G
*************************** 1. row ***************************
           id: 1
  select_type: SIMPLE
        table: cat
   partitions: NULL
         type: index
possible_keys: PRIMARY
          key: name
      key_len: 194
          ref: NULL
         rows: 1
     filtered: 100.00
        Extra: Using index; Using temporary; Using filesort
*************************** 2. row ***************************
           id: 1
  select_type: SIMPLE
        table: sch
   partitions: NULL
         type: ref
possible_keys: PRIMARY,catalog_id
          key: catalog_id
      key_len: 8
          ref: mysql.cat.id
         rows: 3
     filtered: 100.00
        Extra: Using index
*************************** 3. row ***************************
           id: 1
  select_type: SIMPLE
        table: tbl
   partitions: NULL
         type: eq_ref
possible_keys: schema_id
          key: schema_id
      key_len: 202
          ref: mysql.sch.id,const
         rows: 1
     filtered: 100.00
        Extra: Using index condition
*************************** 4. row ***************************
           id: 1
  select_type: SIMPLE
        table: col
   partitions: NULL
         type: eq_ref
possible_keys: PRIMARY
          key: PRIMARY
      key_len: 8
          ref: mysql.tbl.collation_id
         rows: 1
     filtered: 100.00
        Extra: NULL
*************************** 5. row ***************************
           id: 1
  select_type: SIMPLE
        table: stat
   partitions: NULL
         type: eq_ref
possible_keys: PRIMARY
          key: PRIMARY
      key_len: 388
          ref: mysql.sch.name,const
         rows: 1
     filtered: 100.00
        Extra: NULL
5 rows in set, 1 warning (0.00 sec)
mysql> SHOW WARNINGS\G
*************************** 1. row ***************************
  Level: Note
   Code: 1003
Message: /* select#1 */ select `cat`.`name` AS `TABLE_CATALOG`,`sch`.`name` AS `TABLE_SCHEMA`,`tbl`.`name` AS `TABLE_NAME`,`tbl`.`type` AS `TABLE_TYPE`,`tbl`.`engine` AS `ENGINE`,`tbl`.`version` AS `VERSION`,`tbl`.`row_format` AS `ROW_FORMAT`,ifnull(`stat`.`table_rows`,1) AS `TABLE_ROWS`,`stat`.`avg_row_length` AS `AVG_ROW_LENGTH`,`stat`.`data_length` AS `DATA_LENGTH`,`stat`.`max_data_length` AS `MAX_DATA_LENGTH`,`stat`.`index_length` AS `INDEX_LENGTH`,`stat`.`data_free` AS `DATA_FREE`,ifnull(`stat`.`auto_increment`,1) AS `AUTO_INCREMENT`,`tbl`.`created` AS `CREATE_TIME`,`tbl`.`last_altered` AS `UPDATE_TIME`,'' AS `CHECK_TIME`,`col`.`name` AS `TABLE_COLLATION`,`stat`.`checksum` AS `CHECKSUM`,get_dd_create_options(`tbl`.`options`) AS `CREATE_OPTIONS`,`tbl`.`comment` AS `TABLE_COMMENT` from `mysql`.`tables` `tbl` join `mysql`.`schemata` `sch` join `mysql`.`catalogs` `cat` left join `mysql`.`collations` `col` on((`col`.`id` = `tbl`.`collation_id`)) left join `mysql`.`table_stats` `stat` on(((`stat`.`schema_name` = `sch`.`name`) and (`stat`.`table_name` = 'user'))) where ((`tbl`.`schema_id` = `sch`.`id`) and (`sch`.`catalog_id` = `cat`.`id`) and (`tbl`.`name` = 'user') and can_access_table(`sch`.`name`,`tbl`.`name`)) order by `sch`.`name`,`tbl`.`name`
1 row in set (0.00 sec)

That’s it for today. Enjoy testing the data dictionary, and please send in your feedback!

Suggestions for transitioning into Strict SQL-Mode

As MySQL 5.6 now enables the SQL Mode STRICT_TRANS_TABLES for new installations, I have been running into users who have been upgrading from previous versions, and not quite sure how to test their application for compatibility with this new default.

For some applications converting warnings to errors presents an unknown-unknown, in that the operators of the system can not easily detect what may break. Certainly many deployments will have QA environments, but there is always some fear production queries are just a little bit different.

Since sql_mode is configurable on a per-session basis, there are some strategies that I have been recommending to ease transition:

  • Whitelist: Have all new application components enable strict mode by default. For example, if you are building a set of cron jobs to rebuild caches of data – have these scripts set sql-mode strict as soon as they connect to MySQL, but initially leave existing applications without STRICT mode.
  • Blacklist: Modify existing application components that have not extensively been tested with strict mode to explicitly unset this SQL mode when connecting to MySQL. This is an important change, since all new components will then default to being strict.
  • Staged Rollout: Have the ability to turn on/off strict SQL mode on a per user-basis, with perhaps internal users or beta users being the first to have strict mode enabled for. This offers a more gradual transition where you can contain any errors to within a small number of users. This strategy was suggested by @geodbz

That’s my list to date. I would love to hear if anyone has any suggestions on how to better manage the transition process!

Build a MySQL Fabric Farm in one step using AWS CloudFormation

I have been building a CloudFormation template for MySQL Fabric as an experiment to kick the tyres and further my understanding of how it all works.

For those not familiar, CloudFormation is a way of representing a collection of Amazon Cloud resources (a “stack”) into a static json file (a “template”). In my previous company, we managed our AWS account almost exclusively via CloudFormation, and there are two key advantages I see with managing resources via templates:

  • It allows for all environments to be synchronized (dev/qa/production).
  • It allows for very fast disaster recovery (you can very quickly pick up and restore in another region).

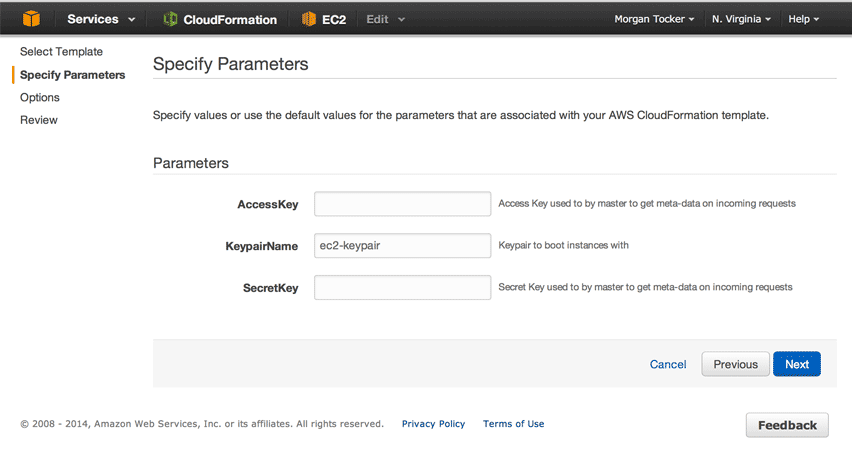
CloudFormation is also a great-fit for MySQL Fabric, since it can remove many of the essential bootstrap steps that come with building a distributed system. It took a bit of work, but I managed to build a template to bring Fabric installation down to three simple questions:

Here are some of the interesting parts:

  • I am using the latest Amazon Linux AMI + the official MySQL yum repositories.
  • The fabric HA group GLOBAL1 is created in an AutoScalingGroup.
  • When the instance in the AutoScalingGroup starts up, it talks back to the fabric backing store to add itself to the HA group.
  • If the AutoScalingGroup is expanded to 2, a new instance will talk to the fabric backing store, find a peer in the same group and create a backup. Once the backup is restored on the new server, it will add itself to the Fabric HA group.

The less interesting part of course is that this is a proof-of-concept. It needs a bit of work to improve error checking etc. You can find the resulting code in my mysql-fabric-scripts project. The file stack.json can be uploaded directly into the Amazon Web Console.

Using MySQL Sandbox to setup a MySQL Fabric cluster in development

With Fabric’s official GA release this week, I thought I would post a spin on how to setup a development environment loosely based on the Fabric Quick Start guide in the manual.

The notable change, is the use of MySQL Sandbox for bootstrapping each of the MySQL instances.

Step 1: Install the MySQL Utilities + Python Connector

In my case, I downloaded:

The GUI install in both cases works as expected. Next, Next, Done!

Step 2: Install MySQL Sandbox

MySQL Sandbox is available via Launchpad or CPAN. There isn’t a major difference between the two, but I happened to choose CPAN.

The advantage of installing Sandbox over a utility such as mysqld_multi, is that it’s much easier to setup and tear down replication.

Step 3: Download a 5.6 tarball

In my case, I downloaded mysql-5.6.17-osx10.7-x86.tar.gz Mac OS X 10.7 (x86, 32-bit), Compressed TAR Archive. On Mac OS X it is useful to use Google Chrome rather than Safari, as you do not want the file automatically decompressed.

Important: Download only! MySQL Sandbox does the install in the next step.

Step 4: Setup the Fabric Backing Store

The first copy of MySQL to setup is the MySQL Fabric backing store. This will house the fabric schema which stores configuration data. Here is the setup line I used:

$ make_sandbox mysql-5.6.17-osx10.7-x86.tar.gz
unpacking /Users/morgo/Downloads/mysql-5.6.17-osx10.7-x86.tar.gz
Executing low_level_make_sandbox --basedir=/Users/morgo/Downloads/5.6.17 \
    --sandbox_directory=msb_5_6_17 \
    --install_version=5.6 \
    --sandbox_port=5617 \
    --no_ver_after_name \
    --my_clause=log-error=msandbox.err
    The MySQL Sandbox,  version 3.0.43
    (C) 2006-2013 Giuseppe Maxia
installing with the following parameters:
upper_directory                = /Users/morgo/sandboxes
sandbox_directory              = msb_5_6_17
sandbox_port                   = 5617
check_port                     =
no_check_port                  =
datadir_from                   = script
install_version                = 5.6
basedir                        = /Users/morgo/Downloads/5.6.17
tmpdir                         =
my_file                        =
operating_system_user          = morgo
db_user                        = msandbox
remote_access                  = 127.%
bind_address                   = 127.0.0.1
ro_user                        = msandbox_ro
rw_user                        = msandbox_rw
repl_user                      = rsandbox
db_password                    = msandbox
repl_password                  = rsandbox
my_clause                      = log-error=msandbox.err
master                         =
slaveof                        =
high_performance               =
prompt_prefix                  = mysql
prompt_body                    =  [\h] {\u} (\d) >
force                          =
no_ver_after_name              = 1
verbose                        =
load_grants                    = 1
no_load_grants                 =
no_run                         =
no_show                        =
do you agree? ([Y],n) Y
loading grants
.. sandbox server started
Your sandbox server was installed in $HOME/sandboxes/msb_5_6_17

Using a configuration similar to the MySQL manual, with the password simply being secret I saved the following to /etc/mysql/fabric.cfg:

[DEFAULT]
prefix =
sysconfdir = /etc
logdir = /var/log
[storage]
address = localhost:5617
user = fabric
password = secret
database = fabric
auth_plugin = mysql_native_password
connection_timeout = 6
connection_attempts = 6
connection_delay = 1
[servers]
user = fabric
password = secret
[protocol.xmlrpc]
address = localhost:32274
threads = 5
user = admin
password = secret
disable_authentication = no
realm = MySQL Fabric
ssl_ca =
ssl_cert =
ssl_key =
[executor]
executors = 5
[logging]
level = INFO
url = file:///var/log/fabric.log
[sharding]
mysqldump_program = /usr/bin/mysqldump
mysqlclient_program = /usr/bin/mysql
[statistics]
prune_time = 3600
[failure_tracking]
notifications = 300
notification_clients = 50
notification_interval = 60
failover_interval = 0
detections = 3
detection_interval = 6
detection_timeout = 1
prune_time = 3600
[connector]
ttl = 1
[client]
password =

I also need to create the user in MySQL for Fabric to connect as:

$ $HOME/sandboxes/msb_5_6_17/use -uroot
Welcome to the MySQL monitor.  Commands end with ; or \g.
Your MySQL connection id is 5
Server version: 5.6.17 MySQL Community Server (GPL)
Copyright (c) 2000, 2014, Oracle and/or its affiliates. All rights reserved.
Oracle is a registered trademark of Oracle Corporation and/or its
affiliates. Other names may be trademarks of their respective
owners.
Type 'help;' or '\h' for help. Type '\c' to clear the current input statement.
mysql [localhost] {root} ((none)) > CREATE USER 'fabric'@'localhost' IDENTIFIED BY 'secret';
Query OK, 0 rows affected (0.01 sec)
mysql [localhost] {root} ((none)) > GRANT ALL ON fabric.* TO 'fabric'@'localhost';
Query OK, 0 rows affected (0.00 sec)

Fabric can then install the system tables, and be started with:

$ mysqlfabric manage setup
[INFO] 1401222720.664261 - MainThread - Initializing persister: user (fabric), server (localhost:5617), database (fabric).
[INFO] 1401222721.245034 - MainThread - Initial password for admin/xmlrpc set
Password set for admin/xmlrpc from configuration file.
[INFO] 1401222721.247700 - MainThread - Password set for admin/xmlrpc from configuration file.
$ mysqlfabric manage start
[INFO] 1401222753.862997 - MainThread - Initializing persister: user (fabric), server (localhost:5617), database (fabric).
[INFO] 1401222753.867357 - MainThread - Loading Services.
[INFO] 1401222753.902501 - MainThread - Fabric node starting.
[INFO] 1401222753.910188 - MainThread - Starting Executor.
[INFO] 1401222753.910300 - MainThread - Setting 5 executor(s).
[INFO] 1401222753.910602 - Executor-0 - Started.
[INFO] 1401222753.911354 - Executor-1 - Started.
[INFO] 1401222753.912450 - Executor-2 - Started.
[INFO] 1401222753.913185 - Executor-3 - Started.
[INFO] 1401222753.914456 - Executor-4 - Started.
[INFO] 1401222753.914701 - MainThread - Executor started.
[INFO] 1401222753.927123 - MainThread - Starting failure detector.
[INFO] 1401222753.928365 - XML-RPC-Server - XML-RPC protocol server ('127.0.0.1', 32274) started.
[INFO] 1401222753.928731 - XML-RPC-Server - Setting 5 XML-RPC session(s).
[INFO] 1401222753.928991 - XML-RPC-Session-0 - Started XML-RPC-Session.
[INFO] 1401222753.929455 - XML-RPC-Session-1 - Started XML-RPC-Session.
[INFO] 1401222753.930168 - XML-RPC-Session-2 - Started XML-RPC-Session.
[INFO] 1401222753.930747 - XML-RPC-Session-3 - Started XML-RPC-Session.
[INFO] 1401222753.931320 - XML-RPC-Session-4 - Started XML-RPC-Session.

Step 5: Build out a HA group

The next step is to bootstrap a 3-node replication sandbox, and then add it as a HA Group in Fabric.

First with MySQL Sandbox:

$ make_replication_sandbox mysql-5.6.17-osx10.7-x86.tar.gz
installing and starting master
installing slave 1
installing slave 2
starting slave 1
.. sandbox server started
starting slave 2
.. sandbox server started
initializing slave 1
initializing slave 2
replication directory installed in $HOME/sandboxes/rsandbox_mysql-5_6_17
$ $HOME/sandboxes/rsandbox_mysql-5_6_17/m -uroot
Welcome to the MySQL monitor.  Commands end with ; or \g.
Your MySQL connection id is 5
Server version: 5.6.17-log MySQL Community Server (GPL)
Copyright (c) 2000, 2014, Oracle and/or its affiliates. All rights reserved.
Oracle is a registered trademark of Oracle Corporation and/or its
affiliates. Other names may be trademarks of their respective
owners.
Type 'help;' or '\h' for help. Type '\c' to clear the current input statement.
master [localhost] {root} ((none)) > GRANT ALL ON *.* TO 'fabric'@'localhost' IDENTIFIED BY 'secret';
Query OK, 0 rows affected (0.01 sec)
master [localhost] {root} ((none)) > SHOW GLOBAL VARIABLES LIKE 'port';
+---------------+-------+
| Variable_name | Value |
+---------------+-------+
| port          | 20082 |
+---------------+-------+
1 row in set (0.00 sec)
master [localhost] {root} ((none)) > exit
Bye

Then with MySQL Fabric:

$ mysqlfabric group create GLOBAL1
Procedure :
{ uuid        = 23593cf1-c516-46ef-beaa-516b333353ca,
  finished    = True,
  success     = True,
  return      = True,
  activities  =
}
$ mysqlfabric group add GLOBAL1 localhost:20082
Procedure :
{ uuid        = e72decdf-6524-45b4-9eb6-6d757c0daf3a,
  finished    = True,
  success     = False,
  return      = ServerError: Server (e208ca4a-e5df-11e3-9dd5-4cd7500a4330) does not have the binary log or gtid enabled.,
  activities  =
}

An error! What this error is saying, is that Fabric is designed to specifically take advantage of Replication with GTIDs which are designed to handle smoother failover if the topology changes. Thankfully, MySQL Sandbox has an easy way of being able to switch to GTIDs:

$ $HOME/sandboxes/rsandbox_mysql-5_6_17/enable_gtid
# option 'master-info-repository=table' added to master configuration file
# option 'relay-log-info-repository=table' added to master configuration file
# option 'gtid_mode=ON' added to master configuration file
# option 'log-slave-updates' added to master configuration file
# option 'enforce-gtid-consistency' added to master configuration file
# option 'master-info-repository=table' added to node1 configuration file
# option 'relay-log-info-repository=table' added to node1 configuration file
# option 'gtid_mode=ON' added to node1 configuration file
# option 'log-slave-updates' added to node1 configuration file
# option 'enforce-gtid-consistency' added to node1 configuration file
# option 'master-info-repository=table' added to node2 configuration file
# option 'relay-log-info-repository=table' added to node2 configuration file
# option 'gtid_mode=ON' added to node2 configuration file
# option 'log-slave-updates' added to node2 configuration file
# option 'enforce-gtid-consistency' added to node2 configuration file
# executing "stop" on /Users/morgo/sandboxes/rsandbox_mysql-5_6_17
executing "stop" on slave 1
executing "stop" on slave 2
executing "stop" on master
# executing "start" on /Users/morgo/sandboxes/rsandbox_mysql-5_6_17
executing "start" on master
. sandbox server started
executing "start" on slave 1
. sandbox server started
executing "start" on slave 2
. sandbox server started

With this change, adding servers to Fabric will now work:

$ mysqlfabric group add GLOBAL1 localhost:20082
Procedure :
{ uuid        = c9da0536-0f3f-4d75-9f29-1ac6c12ff686,
  finished    = True,
  success     = True,
  return      = True,
  activities  =
}
$ mysqlfabric group add GLOBAL1 localhost:20083
Procedure :
{ uuid        = 92b42645-311f-423b-86b4-3a56870db244,
  finished    = True,
  success     = True,
  return      = True,
  activities  =
}
$ mysqlfabric group add GLOBAL1 localhost:20084
Procedure :
{ uuid        = 1f16a586-4a60-4b7d-a339-be3830614984,
  finished    = True,
  success     = True,
  return      = True,
  activities  =
}

We can find group commands with:

$ mysqlfabric group
Commands available in group 'group' are:
    group activate group_id  [--synchronous]
    group description group_id  [--description=NONE] [--synchronous]
    group deactivate group_id  [--synchronous]
    group create group_id  [--description=NONE] [--synchronous]
    group remove group_id server_id  [--synchronous]
    group add group_id address  [--timeout=5] [--update_only] [--synchronous]
    group health group_id
    group lookup_servers group_id  [--server_id=NONE] [--status=NONE] [--mode=NONE]
    group destroy group_id  [--force] [--synchronous]
    group demote group_id  [--update_only] [--synchronous]
    group promote group_id  [--slave_id=NONE] [--update_only] [--synchronous]
    group lookup_groups  [--group_id=NONE]

Of which the useful option will be to list the servers in our group GLOBAL1:

$ mysqlfabric group lookup_servers GLOBAL1
Command :
{ success     = True
  return      = [{'status': 'SECONDARY', 'server_uuid': 'e208ca4a-e5df-11e3-9dd5-4cd7500a4330', 'mode': 'READ_ONLY', 'weight': 1.0, 'address': 'localhost:20082'}, {'status': 'SECONDARY', 'server_uuid': 'e931694e-e5df-11e3-9dd5-4cd64dfe115b', 'mode': 'READ_ONLY', 'weight': 1.0, 'address': 'localhost:20083'}, {'status': 'SECONDARY', 'server_uuid': 'ea61dfba-e5df-11e3-9dd5-4bd23bb2cbe3', 'mode': 'READ_ONLY', 'weight': 1.0, 'address': 'localhost:20084'}]
  activities  =
}

The UUID in use here, is the same one that is used for Replication with GTIDs. To promote the first server as a master:

$ mysqlfabric group promote GLOBAL1 --slave_id=e208ca4a-e5df-11e3-9dd5-4cd7500a4330
Procedure :
{ uuid        = be791f70-be3e-4ee9-9872-e1cedce36791,
  finished    = True,
  success     = True,
  return      = True,
  activities  =
}
$ mysqlfabric group lookup_servers GLOBAL1
Command :
{ success     = True
  return      = [{'status': 'PRIMARY', 'server_uuid': 'e208ca4a-e5df-11e3-9dd5-4cd7500a4330', 'mode': 'READ_WRITE', 'weight': 1.0, 'address': 'localhost:20082'}, {'status': 'SECONDARY', 'server_uuid': 'e931694e-e5df-11e3-9dd5-4cd64dfe115b', 'mode': 'READ_ONLY', 'weight': 1.0, 'address': 'localhost:20083'}, {'status': 'SECONDARY', 'server_uuid': 'ea61dfba-e5df-11e3-9dd5-4bd23bb2cbe3', 'mode': 'READ_ONLY', 'weight': 1.0, 'address': 'localhost:20084'}]
  activities  =
}

Next steps

This How-to can easily be extended to setup additional HA groups for shards – MySQL Sandbox really simplifies the setup by bootstrapping replication.

One caveat to be aware of: Each copy of mysqld running can take up quite a bit of RAM. It is possible to tune this down using some steps that I mentioned in an earlier post.

Installing MySQL 5.6 on Ubuntu 14.04 (Trusty Tahr)

Ubuntu 14.04 defaults to MySQL 5.5, but also has MySQL 5.6 available for installation from the universe archive. Installing 5.6 is as easy as specifying the version, apt-get install mysql-server-5.6:


root@ubuntu1404:~# apt-get install mysql-server-5.6
Reading package lists... Done
Building dependency tree
Reading state information... Done
The following extra packages will be installed:
libaio1 libdbd-mysql-perl libdbi-perl libhtml-template-perl libmysqlclient18 libterm-readkey-perl mysql-client-5.6 mysql-client-core-5.6 mysql-common
mysql-common-5.6 mysql-server-core-5.6
Suggested packages:
libclone-perl libmldbm-perl libnet-daemon-perl libplrpc-perl libsql-statement-perl libipc-sharedcache-perl mailx tinyca
The following NEW packages will be installed:
libaio1 libdbd-mysql-perl libdbi-perl libhtml-template-perl libmysqlclient18 libterm-readkey-perl mysql-client-5.6 mysql-client-core-5.6 mysql-common
mysql-common-5.6 mysql-server-5.6 mysql-server-core-5.6
0 upgraded, 12 newly installed, 0 to remove and 0 not upgraded.
Need to get 21.5 MB of archives.
After this operation, 164 MB of additional disk space will be used.
Do you want to continue? [Y/n] Y
Get:1 http://mirrors.digitalocean.com/ubuntu/ trusty/main libaio1 amd64 0.3.109-4 [6,364 B]
Get:2 http://mirrors.digitalocean.com/ubuntu/ trusty/main mysql-common all 5.5.35+dfsg-1ubuntu1 [14.1 kB]
Get:3 http://mirrors.digitalocean.com/ubuntu/ trusty/main libmysqlclient18 amd64 5.5.35+dfsg-1ubuntu1 [593 kB]
Get:4 http://mirrors.digitalocean.com/ubuntu/ trusty/main libdbi-perl amd64 1.630-1 [879 kB]
Get:5 http://mirrors.digitalocean.com/ubuntu/ trusty/main libdbd-mysql-perl amd64 4.025-1 [99.3 kB]
Get:6 http://mirrors.digitalocean.com/ubuntu/ trusty/main libterm-readkey-perl amd64 2.31-1 [27.4 kB]
Get:7 http://mirrors.digitalocean.com/ubuntu/ trusty/universe mysql-client-core-5.6 amd64 5.6.16-1~exp1 [4,084 kB]
Get:8 http://mirrors.digitalocean.com/ubuntu/ trusty/universe mysql-client-5.6 amd64 5.6.16-1~exp1 [5,591 kB]
Get:9 http://mirrors.digitalocean.com/ubuntu/ trusty/universe mysql-server-core-5.6 amd64 5.6.16-1~exp1 [4,333 kB]
Get:10 http://mirrors.digitalocean.com/ubuntu/ trusty/universe mysql-server-5.6 amd64 5.6.16-1~exp1 [5,839 kB]
Get:11 http://mirrors.digitalocean.com/ubuntu/ trusty/main libhtml-template-perl all 2.95-1 [65.5 kB]
Get:12 http://mirrors.digitalocean.com/ubuntu/ trusty/universe mysql-common-5.6 all 5.6.16-1~exp1 [14.9 kB]
Fetched 21.5 MB in 5s (3,760 kB/s)
Preconfiguring packages ...
Selecting previously unselected package libaio1:amd64.
(Reading database ... 59014 files and directories currently installed.)
Preparing to unpack .../libaio1_0.3.109-4_amd64.deb ...
Unpacking libaio1:amd64 (0.3.109-4) ...
Selecting previously unselected package mysql-common.
Preparing to unpack .../mysql-common_5.5.35+dfsg-1ubuntu1_all.deb ...
Unpacking mysql-common (5.5.35+dfsg-1ubuntu1) ...
Selecting previously unselected package libmysqlclient18:amd64.
Preparing to unpack .../libmysqlclient18_5.5.35+dfsg-1ubuntu1_amd64.deb ...
Unpacking libmysqlclient18:amd64 (5.5.35+dfsg-1ubuntu1) ...
Selecting previously unselected package libdbi-perl.
Preparing to unpack .../libdbi-perl_1.630-1_amd64.deb ...
Unpacking libdbi-perl (1.630-1) ...
Selecting previously unselected package libdbd-mysql-perl.
Preparing to unpack .../libdbd-mysql-perl_4.025-1_amd64.deb ...
Unpacking libdbd-mysql-perl (4.025-1) ...
Selecting previously unselected package libterm-readkey-perl.
Preparing to unpack .../libterm-readkey-perl_2.31-1_amd64.deb ...
Unpacking libterm-readkey-perl (2.31-1) ...
Selecting previously unselected package mysql-client-core-5.6.
Preparing to unpack .../mysql-client-core-5.6_5.6.16-1~exp1_amd64.deb ...
Unpacking mysql-client-core-5.6 (5.6.16-1~exp1) ...
Selecting previously unselected package mysql-client-5.6.
Preparing to unpack .../mysql-client-5.6_5.6.16-1~exp1_amd64.deb ...
Unpacking mysql-client-5.6 (5.6.16-1~exp1) ...
Selecting previously unselected package mysql-server-core-5.6.
Preparing to unpack .../mysql-server-core-5.6_5.6.16-1~exp1_amd64.deb ...
Unpacking mysql-server-core-5.6 (5.6.16-1~exp1) ...
Processing triggers for man-db (2.6.7.1-1) ...
Setting up mysql-common (5.5.35+dfsg-1ubuntu1) ...
Selecting previously unselected package mysql-server-5.6.
(Reading database ... 59386 files and directories currently installed.)
Preparing to unpack .../mysql-server-5.6_5.6.16-1~exp1_amd64.deb ...
Unpacking mysql-server-5.6 (5.6.16-1~exp1) ...
Selecting previously unselected package libhtml-template-perl.
Preparing to unpack .../libhtml-template-perl_2.95-1_all.deb ...
Unpacking libhtml-template-perl (2.95-1) ...
Selecting previously unselected package mysql-common-5.6.
Preparing to unpack .../mysql-common-5.6_5.6.16-1~exp1_all.deb ...
Unpacking mysql-common-5.6 (5.6.16-1~exp1) ...
Processing triggers for ureadahead (0.100.0-16) ...
ureadahead will be reprofiled on next reboot
Processing triggers for man-db (2.6.7.1-1) ...
Setting up libaio1:amd64 (0.3.109-4) ...
Setting up libmysqlclient18:amd64 (5.5.35+dfsg-1ubuntu1) ...
Setting up libdbi-perl (1.630-1) ...
Setting up libdbd-mysql-perl (4.025-1) ...
Setting up libterm-readkey-perl (2.31-1) ...
Setting up mysql-client-core-5.6 (5.6.16-1~exp1) ...
Setting up mysql-client-5.6 (5.6.16-1~exp1) ...
Setting up mysql-server-core-5.6 (5.6.16-1~exp1) ...
Setting up mysql-server-5.6 (5.6.16-1~exp1) ...
2014-04-21 11:50:07 0 [Warning] Using unique option prefix key_buffer instead of key_buffer_size is deprecated and will be removed in a future release. Please use the full name instead.
2014-04-21 11:50:07 0 [Warning] TIMESTAMP with implicit DEFAULT value is deprecated. Please use --explicit_defaults_for_timestamp server option (see documentation for more details).
mysql start/running, process 2355
Setting up libhtml-template-perl (2.95-1) ...
Setting up mysql-common-5.6 (5.6.16-1~exp1) ...
Processing triggers for libc-bin (2.19-0ubuntu6) ...
Processing triggers for ureadahead (0.100.0-16) ...

And then:


root@ubuntu1404:~# mysql -uroot -p
Enter password:
Welcome to the MySQL monitor. Commands end with ; or \g.
Your MySQL connection id is 45
Server version: 5.6.16-1~exp1 (Ubuntu)

Copyright (c) 2000, 2014, Oracle and/or its affiliates. All rights reserved.

Oracle is a registered trademark of Oracle Corporation and/or its
affiliates. Other names may be trademarks of their respective
owners.

Type 'help;' or '\h' for help. Type '\c' to clear the current input statement.

mysql> select version();
+---------------+
| version() |
+---------------+
| 5.6.16-1~exp1 |
+---------------+
1 row in set (0.00 sec)

Update: A slightly more detailed tutorial for this is available here. Thank you internet!

Installing MySQL 5.7 DMR3 with the official yum repos

In case you missed Norvald’s post, the official yum repos now support the 5.7 development releases!
The MySQL manual documents how you can enable 5.7, but I wanted to also provide a quick demonstration since using yum sub-repositories is a new concept to me.

Installing the repo

All versions of MySQL are downloaded via a single repo file, which can be downloaded from: http://dev.mysql.com/downloads/repo/.
You can copy the URL from the download page directly into a yum localinstall command. For example on Enterprise Linux 6, the command is:

sudo yum localinstall http://dev.mysql.com/get/mysql-community-release-el6-5.noarch.rpm

Activating MySQL 5.7

The default version of MySQL enabled with the repo will be MySQL 5.6 GA. The documented way to change this to 5.7 is:

shell> sudo yum-config-manager --disable mysql56-community
shell> sudo yum-config-manager --enable mysql57-community-dmr

You also have the option to manually edit the sources.list file, which if you run the above commands will now contain:
{% raw %}

[root@mysqlrpm ~]# cat /etc/yum.repos.d/mysql-community.repo
[mysql-connectors-community]
name=MySQL Connectors Community
baseurl=http://repo.mysql.com/yum/mysql-connectors-community/el/6/$basearch/
enabled=1
gpgcheck=1
gpgkey=file:/etc/pki/rpm-gpg/RPM-GPG-KEY-mysql
[mysql-tools-community]
name=MySQL Tools Community
baseurl=http://repo.mysql.com/yum/mysql-tools-community/el/6/$basearch/
enabled=1
gpgcheck=1
gpgkey=file:/etc/pki/rpm-gpg/RPM-GPG-KEY-mysql
# Enable to use MySQL 5.5
[mysql55-community]
name=MySQL 5.5 Community Server
baseurl=http://repo.mysql.com/yum/mysql-5.5-community/el/6/$basearch/
enabled=0
gpgcheck=1
gpgkey=file:/etc/pki/rpm-gpg/RPM-GPG-KEY-mysql
# Enable to use MySQL 5.6
[mysql56-community]
name=MySQL 5.6 Community Server
baseurl=http://repo.mysql.com/yum/mysql-5.6-community/el/6/$basearch/
enabled=0
gpgcheck=1
gpgkey=file:/etc/pki/rpm-gpg/RPM-GPG-KEY-mysql
# Note: MySQL 5.7 is currently in development. For use at your own risk.
# Please read with sub pages: https://dev.mysql.com/doc/relnotes/mysql/5.7/en/
[mysql57-community-dmr]
name=MySQL 5.7 Community Server Development Milestone Release
baseurl=http://repo.mysql.com/yum/mysql-5.7-community/el/6/$basearch/
enabled=1
gpgcheck=1
gpgkey=file:/etc/pki/rpm-gpg/RPM-GPG-KEY-mysql

{% endraw %}
From there, a yum install will show MySQL 5.7 as the intended version to be installed:
{% raw %}

[root@mysqlrpm ~]# yum install mysql-community-server
Loaded plugins: fastestmirror
Loading mirror speeds from cached hostfile
 * base: ftp.osuosl.org
 * extras: ftp.osuosl.org
 * updates: ftp.osuosl.org
Setting up Install Process
Resolving Dependencies
--> Running transaction check
---> Package mysql-community-server.x86_64 0:5.7.3-0.1.m13.el6 will be installed
--> Finished Dependency Resolution
Dependencies Resolved
====================================================================================================================================================================
 Package                                     Arch                        Version                                   Repository                                  Size
====================================================================================================================================================================
Installing:
 mysql-community-server                      x86_64                      5.7.3-0.1.m13.el6                         mysql57-community-dmr                       62 M
Transaction Summary
====================================================================================================================================================================
Install       1 Package(s)
Total download size: 62 M
Installed size: 281 M
Is this ok [y/N]:

{% endraw %}
Update: yum-config-manager is part of yum-utils. You may need to install it first with yum install yum-utils.

Upgrading from the earlier MySQL RPM Format to Yum Repos

The packages that are available in the yum repos contain a number of enhancements over the RPM packages that are available from dev.mysql.com.
Norvald blogged on some of these enhancements earlier. Today I wanted to walk through a safe upgrade path, as they are not quite compatible with each-other.

My Existing Installation

To start with, the packages I have installed came from “Red Hat Enterprise Linux 6 / Oracle Linux 6 (x86, 64-bit), RPM Bundle” on dev.mysql.com. You can check which packages you have installed with:

[root@localhost ~]# rpm -qa | grep -i mysql
MySQL-client-5.6.14-1.el6.x86_64
MySQL-embedded-5.6.14-1.el6.x86_64
MySQL-server-5.6.14-1.el6.x86_64
MySQL-shared-5.6.14-1.el6.x86_64
MySQL-devel-5.6.14-1.el6.x86_64
MySQL-test-5.6.14-1.el6.x86_64
MySQL-shared-compat-5.6.14-1.el6.x86_64

Uninstalling and Installing Yum repos

I recommend first running yum update before removing, and then installing the new repo:

yum update
yum localinstall http://repo.mysql.com/mysql-community-release-el6-3.noarch.rpm

After this step, stop MySQL (note the missing d in the dev.mysql.com packages):

service mysql stop

Now with yum shell it’s possible to uninstall the existing packages (listed in ‘my existing installation’ above) and install the replacement packages from the yum repo in one step:

yum shell
 > remove MySQL-shared MySQL-devel MySQL-test MySQL-server MySQL-client MySQL-shared-compat MySQL-embedded
 > install mysql-server mysql-libs mysql-libs-compat
 > run
 > quit

Here was the summary output from my yum session:

=================================================================================================================================================================
 Package                                     Arch                   Version                      Repository                                                 Size
=================================================================================================================================================================
Installing:
 mysql-community-libs                        x86_64                 5.6.14-3.el6                 mysql-community                                           1.8 M
 mysql-community-libs-compat                 x86_64                 5.6.14-3.el6                 mysql-community                                           1.6 M
 mysql-community-server                      x86_64                 5.6.14-3.el6                 mysql-community                                            51 M
Removing:
 MySQL-client                                x86_64                 5.6.14-1.el6                 @/MySQL-client-5.6.14-1.el6.x86_64                         81 M
 MySQL-devel                                 x86_64                 5.6.14-1.el6                 @/MySQL-devel-5.6.14-1.el6.x86_64                          19 M
 MySQL-embedded                              x86_64                 5.6.14-1.el6                 @/MySQL-embedded-5.6.14-1.el6.x86_64                      432 M
 MySQL-server                                x86_64                 5.6.14-1.el6                 @/MySQL-server-5.6.14-1.el6.x86_64                        235 M
 MySQL-shared                                x86_64                 5.6.14-1.el6                 @/MySQL-shared-5.6.14-1.el6.x86_64                        8.4 M
 MySQL-shared-compat                         x86_64                 5.6.14-1.el6                 @/MySQL-shared-compat-5.6.14-1.el6.x86_64                  11 M
 MySQL-test                                  x86_64                 5.6.14-1.el6                 @/MySQL-test-5.6.14-1.el6.x86_64                          318 M
Installing for dependencies:
 mysql-community-client                      x86_64                 5.6.14-3.el6                 mysql-community                                            18 M
 mysql-community-common                      x86_64                 5.6.14-3.el6                 mysql-community                                           296 k
Transaction Summary
=================================================================================================================================================================
Install       5 Package(s)
Remove        7 Package(s)

MySQL should now be installed from the yum packages. You just have two more steps to complete – start it, and configure it on boot:

service mysqld start # note the added 'd'
chkconfig mysqld on

Your original /etc/my.cnf is even saved. You can compare it to /etc/my.cnf.rpmnew if you would like to consider switching to the new one.
Still having problems? I recommend heading to the MySQL Forums. There is a section dedicated to Install & Repo help.

Installing the latest MySQL 5.6 on Amazon Linux using official repos

In case you missed the announcement Monday, there are now official yum repositories for Fedora 18, 19 and Enterprise Linux 6 (Red Hat and Oracle Linux).
In my case however, I often use Amazon Web Services, and I find that Amazon Linux is just a little bit friendlier to use, since it has better mirror configuration out of the box.
The good news for me is that the official MySQL yum repositories (unofficially) work just fine. Here is an example installation:

sudo yum localinstall http://repo.mysql.com/mysql-community-release-el6-3.noarch.rpm
sudo yum install mysql-community-server
sudo service mysqld start

Configure mysqld to start on boot:

sudo chkconfig mysqld on
chkconfig --list mysqld

And that’s it, you’re all set up and running. One thing I noticed, is the configuration file included is very clean! This is because MySQL has improved all the defaults in 5.6:

# For advice on how to change settings please see
# http://dev.mysql.com/doc/refman/5.6/en/server-configuration-defaults.html
[mysqld]
#
# Remove leading # and set to the amount of RAM for the most important data
# cache in MySQL. Start at 70% of total RAM for dedicated server, else 10%.
# innodb_buffer_pool_size = 128M
#
# Remove leading # to turn on a very important data integrity option: logging
# changes to the binary log between backups.
# log_bin
#
# Remove leading # to set options mainly useful for reporting servers.
# The server defaults are faster for transactions and fast SELECTs.
# Adjust sizes as needed, experiment to find the optimal values.
# join_buffer_size = 128M
# sort_buffer_size = 2M
# read_rnd_buffer_size = 2M
datadir=/var/lib/mysql
socket=/var/lib/mysql/mysql.sock
# Disabling symbolic-links is recommended to prevent assorted security risks
symbolic-links=0
# Recommended in standard MySQL setup
sql_mode=NO_ENGINE_SUBSTITUTION,STRICT_TRANS_TABLES
[mysqld_safe]
log-error=/var/log/mysqld.log
pid-file=/var/run/mysqld/mysqld.pid

It doesn’t get much simpler than this. I love it!
Norvald has also blogged about some of the other improvements to the packaging (systemd,
tmpfiles.d, SELinux, multilib).